Auto Load more Data on Page Scroll using AJAX in Laravel 9
This article aims to provide a comprehensive guide on how to create an AJAX auto Load More data feature that is triggered when the page is scrolled in Laravel 9, which can also be utilized in Laravel 8 and 10. The AJAX Load More data on-page scroll allows for the loading of data without the need for a page refresh, which can significantly save time and prevent crashes when dealing with large amounts of data.
The article will cover the step-by-step process of creating a jQuery AJAX Load More on page scroll in Laravel 9, as well as provide an example of implementing AJAX Load More pagination on page scroll in both Laravel 8 and 9. With this knowledge, you will be able to develop efficient and flexible Load More data pagination solutions for your Laravel projects that trigger on page scroll.

To create an AJAX-based Load More button pagination in Laravel, you can follow these straightforward steps:
- Step 1: Install Laravel 9 and configure the .env file
- Step 2: Use a single command to create Model, Controller, and Seeder files
- Step 3: Migrate the database and seed it with dummy data
- Step 4: Create two routes
- Step 5: Create a Controller
- Step 6: Develop a View file
- Step 7: Run the Laravel 9 application
Step 1: Install Laravel 9 and configure the .env file
for this step, you can follow the tutorial "Install laravel 9 from scratch". Else you can simply run the below command:
composer create-project laravel/laravel load-more-button-appAfter installing the laravel app you have to create a database and open .env file and configure it like the below:
                                                    DB_CONNECTION=mysql
DB_HOST=localhost
DB_PORT=3306
DB_DATABASE=load-more-button-app
DB_USERNAME=root

DB_PASSWORD=root
Step 2: Use a single command to create Model, Controller, and Seeder files
The second step in creating an AJAX-based Load More button pagination in Laravel involves generating the Model, Controller, and Seeder files using a single command:
php artisan make:model Post -msc
This command generates three files - The post.php model file inside the App\Models directory, the posts table migration file inside the database\migrations directory, and the PostSeeder.php file inside the database\seeder directory.
Step 3: Migrate the database and seed it with dummy data
Now you have to set up our dummy data in the seeder file PostSeeder.php:
                                                    <?php
namespace Database\Seeders;
use Illuminate\Database\Console\Seeds\WithoutModelEvents;
use Illuminate\Database\Seeder;

use App\Models\Post;

class PostSeeder extends Seeder
{
    /**
     * Run the database seeds.
     *
     * @return void
     */
    public function run()
    {
        $num_users = 80;

        // Use a loop to create multiple users
        for ($i = 1; $i < $num_users; $i++) {
        Post::create([
            'title' => "Test title $i",
            'description' => "Lorem ipsum dolor sit amet consectetur adipisicing elit. Quod consequuntur vero facilis perspiciatis.",
          ]);
        }
    }
}
Now Call it inside DatabaseSeeder.php
                                                    public function run()
    {
        $this->call([
            PostSeeder::class,
            //other seeder class
        ]);
    }
php artisan migrate --seed
Step 4: Create two routes
                                                    <?php
use Illuminate\Support\Facades\Route;
use App\Http\Controllers\PostController;

Route::get('/posts', [PostController::class,'index'])->name('posts.index');
Route::get('/load-more-data', [PostController::class,'loadMoreData'])->name('load.more');

Route::get('/', function () {
    return view('welcome');
});
If you want to learn more about how to seed dummy data in Laravel, you can refer to the following tutorial:
"How to Insert Dummy Data in the Database using Seeder and Model in Laravel"
This tutorial provides a detailed guide on how to use Seeder and Model to insert dummy data into the database
Step 5: Create a Controller
In Step 3, we have already created the Controller file. Now, we need to define a function in it. To do so, follow the below steps:
- Open the PostController.php file from App\Http\Controllers\PostController.php.
- Paste the following code in the file:
                                                    <?php

namespace App\Http\Controllers;

use Illuminate\Http\Request;
use App\Models\Post;

class PostController extends Controller
{
    public function index()
    {
        $posts = Post::paginate(10);
        return view('posts.index', compact('posts'));
    }

    public function loadMoreData(Request $request)
    {
        $start = $request->input('start');

        $data = Post::orderBy('id', 'ASC')
            ->offset($start)
            ->limit(10)
            ->get();

        return response()->json([
            'data' => $data,
            'next' => $start + 10
        ]);

    }
}
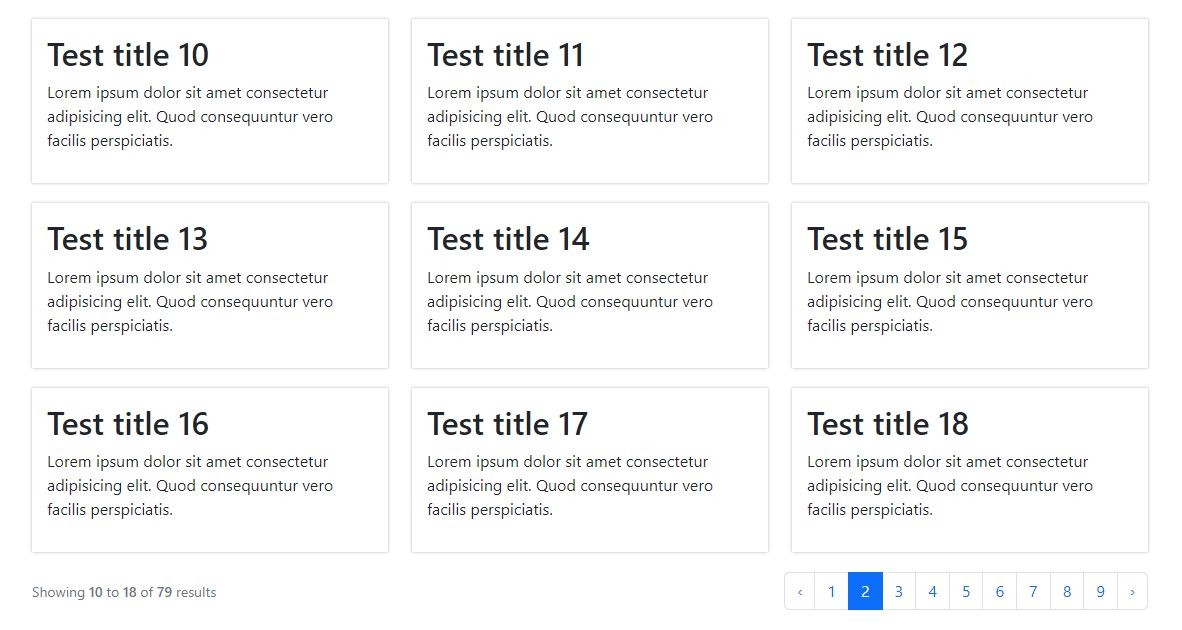
Step 6: Create a View file index.blade.php
To create the index.blade.php file in the resources/views/posts folder and paste the code given below, follow these steps:
- Go to the resources/views/posts folder.
- Create a new file named index.blade.php.
- Paste the following code in the file:
                                                    <!DOCTYPE html>
<html lang="en">

<head>
    <meta charset="UTF-8">
    <meta name="viewport" content="width=device-width, initial-scale=1.0">
    <meta http-equiv="X-UA-Compatible" content="ie=edge">
    <title>How to Create Ajax based Bootstrap Pagination in Laravel 9</title>

    <link href="https://cdn.jsdelivr.net/npm/[email protected]/dist/css/bootstrap.min.css" rel="stylesheet"
        integrity="sha384-rbsA2VBKQhggwzxH7pPCaAqO46MgnOM80zW1RWuH61DGLwZJEdK2Kadq2F9CUG65" crossorigin="anonymous">
    <style>
        #items_container .content_box div {
            box-shadow: 0 0 3px rgba(0, 0, 0, .3);
            padding: 15px;
            margin-bottom: 20px;
        }
    </style>
</head>

<body>

    <div class="container py-4 my-3">
        <div class="row mb-5">
            <div class="col-md-12">
                <h2>Ajax Load more post example on page scroll</h2>
                <div class="row pt-3" id="items_container">

                    @foreach ($posts as $item)
                        <div class="col-md-4 content_box">
                            <div>
                                <h2>{{ $item->title }}</h2>
                                <p>{{ $item->description }}</p>
                            </div>
                        </div>
                    @endforeach
                </div>
                <div class="col-md-12">
                    <div class="text-center">
                        <div class="ajax_load" style="display: none">
                            <div class="spinner-border text-success spinner-border-md" role="status">
                                <span class="visually-hidden">Loading...</span>
                            </div>
                            <div class="spinner-grow text-success spinner-grow-md" role="status">
                                <span class="visually-hidden">Loading...</span>
                            </div>
                        </div>
                    </div>
                </div>
            </div>
        </div>
    </div>

    <script src="https://code.jquery.com/jquery-3.6.4.min.js"
        integrity="sha256-oP6HI9z1XaZNBrJURtCoUT5SUnxFr8s3BzRl+cbzUq8=" crossorigin="anonymous"></script>
    <script>
        $(document).ready(function() {
            var start = 10;
            $(window).scroll(function() {
                if ($(window).scrollTop() + $(window).height() >= $(document).height()) {
                    loadData(start);
                    start = start + 10;
                }
            });
        });

        function loadData(start) {
            //var start = 10;
            $.ajax({
                url: "{{ route('load.more') }}",
                method: "GET",
                data: {
                    start: start
                },
                dataType: "json",
                beforeSend: function() {
                    $('.ajax_load').show();
                },
                success: function(data) {

                    if (data.data.length > 0) {
                        var html = '';
                        for (var i = 0; i < data.data.length; i++) {
                            html += `<div class="col-md-4 content_box">
                                            <div>
                                                <h2>` + data.data[i].title + `</h2>
                                                <p>` + data.data[i].description + `</p>
                                            </div>
                                        </div>`;
                        }
                        //console.log(html);
                        //append data  without fade in effect
                        //$('#items_container').append(html);

                        //append data with fade in effect
                        $('#items_container').append($(html).hide().fadeIn(1000));
                        $('.ajax_load').show();
                        //start = data.next;
                        console.log(start);
                    } else {
                        $('.ajax_load').show().html('No More Data Available');
                        // $('.ajax_load').attr('disabled', true);
                    }
                }
            });
        }
    </script>
</body>

</html>
Let's Understand the jQuery Ajax script that is added bottom of the above code:
The $(document).ready() function checks if the page has finished loading and then creates an event listener for the scroll event.
The $(window).scroll() function checks if the user has scrolled to the bottom of the page by comparing the current vertical position of the scroll bar with the height of the document.
When the user has scrolled to the bottom, the loadData() function is called, which sends an AJAX request to the Laravel route load.more with the start parameter.
The dataType parameter is set to "json" to ensure that the response data is in JSON format. The beforeSend function displays a loading icon before the AJAX request is sent.
When the AJAX request is successful, the success function is called and the response data is processed. If there is more data available, it is appended to the "#items_container" div using jQuery's append() function.
If there is no more data available, the "No More Data Available" message is displayed in the ".ajax_load" div.
Step 7: Run the Laravel 9 application
Now run the command below to run the app:
php artisan serve
Now open http://127.0.0.1:8000/posts or http://localhost:8000/posts
If you are using this code after downloading from here make sure to run the bellow command after downloading and before doing anything.
composer install