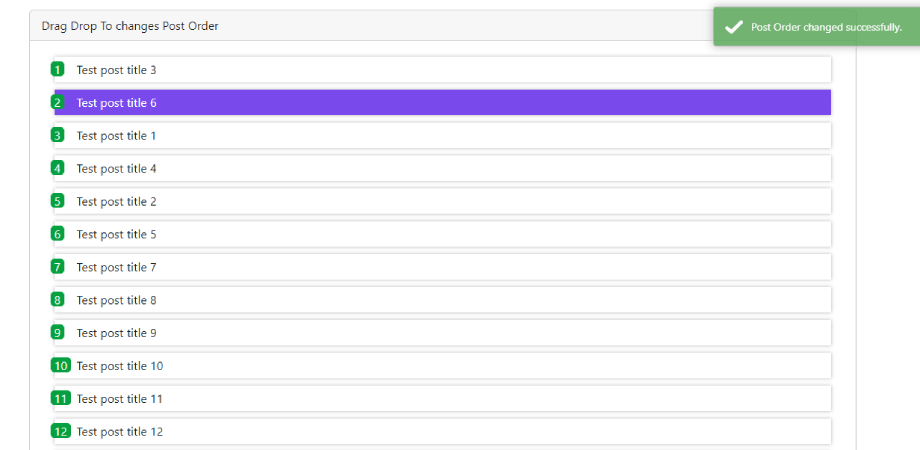
Drag Drop to Change Post or Menu order in laravel
In this tutorial, you will learn how to implement a drag and drop functionality in Laravel to enable users to reorder posts or menus by simply dragging and dropping them.
Here are the steps to create drag and drop functionality to change post or menu order in Laravel:
- Step 1: Install Laravel 9 and configure the .env file
- Step 2: Generate a Model, Controller, and Seeder file using a single command
- Step 3: Define migration schema and create a seeder for dummy data
- Step 4: Migrate the database and seed dummy data
- Step 5: Create two Routes
- Step 6: Create a Controller functions to handle drag-and-drop functionality
- Step 7: Create a View file with drag-and-drop functionality
- Step 8: Run the Laravel 9 application
Step 1: Install Laravel 9 and configure the .env file
To set up the environment for the drag-and-drop reordering post or menu in Laravel, you can either follow a tutorial on "Installing Laravel 9 from scratch" or execute the following command:
composer create-project laravel/laravel load-more-button-app
In the above HTML code uses Bootstrap for styling and jQuery UI for the drag-and-drop functionality. Additionally, Toastr.js is used to display a message when a post is successfully reordered.
At the bottom of the view file, I have added a JavaScript code block that is executed when the document is ready. It initializes a jQuery sortable on an element with the ID "post_sortable". When the order of the sortable list is updated, it retrieves the IDs of the list items and sends them to the server via an AJAX POST request, along with a CSRF token. If the request is successful, a success message is displayed using the toaster library, and the positions of the list items are updated. If there is an error, the console logs the response text.
Overall, this HTML code provides an easy and user-friendly way for the user to reorder the posts on the webpage.
Step 8: Run the Laravel 9 application
Now to start the application, run the below command
php artisan serve
Now open http://127.0.0.1:8000/post/order or http://localhost:8000/posts/order
If you have downloaded this code, run the below-mentioned command to run the application:
                                                    //step 1  run
composer install

//step 2  setup .env

//step 3 run
php artisan migrate --seed

//step 4 run
php artisan serve

//then open this link in the browser
http://127.0.0.1:8000/post/order or http://localhost:8000/posts/order
Once the Laravel application is installed, you need to create a database and configure the .env file as follows:
                                                    DB_CONNECTION=mysql
DB_HOST=127.0.0.1
DB_PORT=3306
DB_DATABASE=laravel_change_order_dragdrop
DB_USERNAME=root
DB_PASSWORD=
Step 2: Generate a Model, Controller, and Seeder file using a single command
php artisan make:model Post -msc
Executing this one command will generate three files: the Post.php model file within the App\Models directory, a migration file for the posts table within the database\migrations directory, and the PostSeeder.php file within the database\seeder directory.
Step 3: Define migration schema and create a seeder for dummy data
Define migration schema
                                                    public function up()
    {
        Schema::create('posts', function (Blueprint $table) {
            $table->id();
            $table->string('title');
            $table->longText('description')->nullable();
            $table->integer('status')->default(0);
            $table->integer('position')->nullable();
            $table->timestamps();
        });
    }
Create a seeder for dummy data
                                                    <?php

namespace Database\Seeders;

use Illuminate\Database\Console\Seeds\WithoutModelEvents;
use Illuminate\Database\Seeder;

use App\Models\Post;

class PostSeeder extends Seeder
{
    /**
     * Run the database seeds.
     *
     * @return void
     */
    public function run()
    {

        for($i =1; $i<=20; $i++){
            Post::create([
            'title' =>  'Test post title '.$i,
            'status' =>  rand(0, 1),
            'position' =>  $i,
            'description' =>  'Lorem ipsum dolor sit amet, consectetur adipisicing elit. Odio ratione eius qui',
            ]);
        }
    }
}
Step 4: Migrate the database and seed dummy data
Call the above-created seeder file inside the DatabaseSeeder.php file
                                                    <?php

namespace Database\Seeders;

// use Illuminate\Database\Console\Seeds\WithoutModelEvents;
use Illuminate\Database\Seeder;

class DatabaseSeeder extends Seeder
{
    /**
     * Seed the application's database.
     *
     * @return void
     */
    public function run()
    {
        $this->call([
            PostSeeder::class,
        ]);

        // \App\Models\User::factory(10)->create();

        // \App\Models\User::factory()->create([
        //     'name' => 'Test User',
        //     'email' => '[email protected]',
        // ]);
    }
}
Now run the below command to create table and seed dummy data:
                                                    php artisan migrate  --seed

//OR run seperatly
//for migrating the database
php artisan migrate

//for seeding the dummy data
php artisan db:seed
To learn more about how to insert dummy data in Laravel using seeders and models, you can follow this tutorial "How to Seed Dummy Data into a Laravel Application using Models and Seeders"
Step 5: Create two Routes
                                                    <?php

use Illuminate\Support\Facades\Route;

use App\Http\Controllers\PostController;


Route::get('/', function () {
    return view('welcome');
});

Route::get('/post/order', [PostController::class, 'post_order'])->name('post.post_order');
Route::post('/post/post_order_change', [PostController::class, 'post_order_change'])->name('post.order_change');
Step 6: Create a Controller functions to handle drag-and-drop functionality
                                                    <?php

namespace App\Http\Controllers;

use Illuminate\Http\Request;

use App\Models\Post;

class PostController extends Controller
{
    public function post_order(Request $request)
    {
        $post = Post::orderBy('position', 'asc')->get();

        return view('post.post_order', compact('post'));

    }
    public function post_order_change(Request $request)
    {
    $data = $request->input('order');
        foreach ($data as $index => $id) {
            Post::where('id', $id)->update(['position' => $index]);
        }
        return  response()->json([

            'message' => 'Post Order changed successfully.',

            'alert-type' => 'success'

        ]);
    //return response()->json(['success' => $data]);
    }
}
Step 7: Create a View file with drag-and-drop functionality
                                                    <!DOCTYPE html>
<html lang="en">

<head>
    <meta charset="UTF-8">
    <meta name="viewport" content="width=device-width, initial-scale=1.0">
    <meta http-equiv="X-UA-Compatible" content="ie=edge">
    <title>Laravel Drag Drop Reordering</title>
    <link href="https://cdn.jsdelivr.net/npm/[email protected]/dist/css/bootstrap.min.css" rel="stylesheet"
        integrity="sha384-Zenh87qX5JnK2Jl0vWa8Ck2rdkQ2Bzep5IDxbcnCeuOxjzrPF/et3URy9Bv1WTRi" crossorigin="anonymous">

        <link rel="stylesheet" href="https://cdnjs.cloudflare.com/ajax/libs/toastr.js/latest/toastr.css" integrity="sha512-3pIirOrwegjM6erE5gPSwkUzO+3cTjpnV9lexlNZqvupR64iZBnOOTiiLPb9M36zpMScbmUNIcHUqKD47M719g==" crossorigin="anonymous" referrerpolicy="no-referrer" />

        <script src="https://code.jquery.com/jquery-3.7.0.min.js" integrity="sha256-2Pmvv0kuTBOenSvLm6bvfBSSHrUJ+3A7x6P5Ebd07/g=" crossorigin="anonymous"></script>

        <script src="https://code.jquery.com/ui/1.13.2/jquery-ui.min.js" integrity="sha256-lSjKY0/srUM9BE3dPm+c4fBo1dky2v27Gdjm2uoZaL0=" crossorigin="anonymous"></script>
        <script src="https://cdnjs.cloudflare.com/ajax/libs/toastr.js/latest/toastr.min.js" integrity="sha512-VEd+nq25CkR676O+pLBnDW09R7VQX9Mdiij052gVCp5yVH3jGtH70Ho/UUv4mJDsEdTvqRCFZg0NKGiojGnUCw==" crossorigin="anonymous" referrerpolicy="no-referrer"></script>
    <style>
 .post_list_ul {
            margin: 0px;
            padding: 5px;
        }

        .post_list_ul li {
            list-style: none;
            padding: 5px 10px 5px 30px;
            background: #fff;
            box-shadow: 0 0 5px 0 rgba(0, 0, 0, 0.3);
            margin-bottom: 10px;
            cursor: move;
            position: relative;
            font-size: 16px;
        }


        .post_list_ul li .pos_num {
            display: inline-block;
            padding: 2px 5px;
            /* width: 30px; */
            height: 20px;
            line-height: 17px;
            background: rgb(6, 160, 65);
            color: #fff;
            text-align: center;
            border-radius: 5px;
            position: absolute;
            left: -5px;
            top: 6px;
        }

        .post_list_ul li:hover {
            list-style: none;
            background: #7a49eb;
            color: #fff;
        }

        .post_list_ul li.ui-state-highlight {
            padding: 20px;
            background-color: #eaecec;
            border: 1px dotted #ccc;
            cursor: move;
            margin-top: 12px;
        }

        .post_list_ul .btn_move {
            display: inline-block;
            cursor: move;
            background: #ededed;
            border-radius: 2px;
            width: 30px;
            height: 30px;
            text-align: center;
            line-height: 30px;
        }
        </style>
</head>

<body>
    <div class="container p-3">
        <div class="row">

            <div class="col-md-12">

                @if (session('message'))
                    <h3 style="color:green">{{ session('message') }}</h3>
                @endif
            </div>

            <div class="col-md-12">

                <div class="card">
                    <div class="card-header with-border d-flex justify-content-between align-items-center">
                        Drag Drop To changes Post Order
                    </div>
                    <!-- /.card-header -->
                    <div class="card-body">
                        <div class="table-responsive">
                            <div id="example1_wrapper" class="dataTables_wrapper container-fluid dt-bootstrap4">
                                <div class="row">
                                    <div class="col-sm-12">
                                        <ul id="post_sortable" class="post_list_ul">
                                            @foreach ($post as $post)
                                                <li class="ui-state-default" data-id="{{ $post->id }}">
                                                    <span class="pos_num">{{ $loop->index + 1 }}</span>
                                                    <span>{{ $post->title }}</span>
                                                </li>
                                            @endforeach
                                            </li>
                                        </ul>

                                    </div>
                                </div>
                            </div>
                        </div>
                    </div>
                    <!-- /.card-body -->
                </div>

            </div>
        </div>

    </div>


    <script>
        $(document).ready(function() {
            $("#post_sortable").sortable({
                placeholder: "ui-state-highlight",
                update: function(event, ui) {
                    //var data = $(this).sortable('toArray');

                    var post_order_ids = new Array();
                    $('#post_sortable li').each(function() {
                        post_order_ids.push($(this).data("id"));
                    });

                    console.log(post_order_ids);
                    $.ajax({
                        type: "POST",
                        url: "{{ route('post.order_change') }}",
                        dataType: "json",
                        data: {
                            order: post_order_ids,
                            _token: "{{ csrf_token() }}"
                        },
                        success: function(response) {
                            toastr.success(response.message);
                            $('#post_sortable li').each(function(index) {
                                $(this).find('.pos_num').text(index + 1);

                                //console.log(index);
                            });

                        },
                        error: function(xhr, status, error) {
                            console.log(xhr.responseText);
                        }
                    });
                }
            });
        });
    </script>

</body>

</html>
-
 Sahrukh
Nice knowledgeable tutorial